

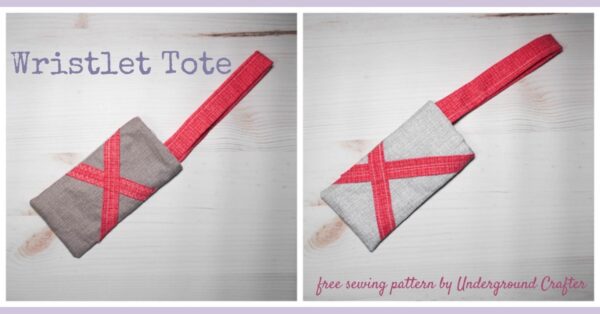
I’m sharing an easy sewing pattern for beginners that is interesting enough for experienced sewists looking for a quick project. The Wristlet Tote is perfect for carrying your phone, your ID card or debit card, and other essentials while at work or on the go.
This post contains affiliate links. I may receive compensation (at no added cost to you) if you make a purchase using these links. I am a Baby Lock Brand Ambassador and a Benartex Brand Ambassador and this post is part of our ongoing collaborations. Additional supplies were provided by Clover, Oliso, and Sewing by Sarah.
This year, I’m excited to be part of the Brand Ambassador team for Benartex. For the kick off of the Brand Ambassador program, Benartex challenged everyone to make a tote using fabrics from our welcome box and incorporating their logo in a creative way.
If you’re a new sewist, you may not be familiar with Benartex, but if you’ve been quilting for a while it is definitely a name you have heard! You can check out my unboxing video below to see what was in my welcome box.
If you can’t see the welcome box unboxing video above, click HERE to watch it on Facebook.
Besides some fabulous notions and fun Benartex goodies, inside of the welcome box there was an entire case of fat quarters in Color Weave by the Contempo Studio. My head almost exploded with all of the options! If you’re new to Color Weave, it’s part of the basics collection at Benartex and the fabrics have the appearance of an artistic weave. For beginner sewists and quilters, this is a great fabric to work with because the print is omnidirectional (there is no “up” or “down” or “right” or “left”) and the “weave” lines aren’t perfectly straight (like plaid, a beginner sewist’s nightmare!). This means these are super forgiving fabrics to work with, but much more interesting than solid fabrics. And, of course, 100% cotton quilting fabric is very easy to work with – no special needles or presser feet are required.

When I started to think about tote ideas, I knew I didn’t need yet another simple market tote like the Geometric Applique Tote, or another quilt block tote like the Quilted Tote or the Stack and Slice Quilted Tote. When I really started to think about the scenarios where I wanted a tote, it was at work. Recently, the college where I teach moved to a new location and my office is now part of a co-working space. I am always trying to figure out how to carry my essentials (my phone, my office key, my ID card) around the building without bringing a huge bag with me everywhere. And, that’s where I came up with the idea for the Wristlet Tote! It’s just the right size for the essentials and since it’s attached to my wrist, I can’t possibly forget it somewhere.

The construction of this easy sewing pattern for beginners is similar to any simple tote, but much smaller so you can finish it up fast. Also, I incorporated the X in the Benartex logo in an abstract way that lets you explore different stitches on your sewing machine. The approach I used is very easy for beginner sewists to master, and – best of all! – any and all mistakes are easily disguised as “design elements.” So, are you ready to make your Wristlet Tote?

Wristlet Tote
Easy Sewing Pattern for Beginners by Underground Crafter

The Wristlet Tote is an easy sewing pattern for beginners that lets you sample several of your sewing machine’s stitches; practice piecing together quilting fabric; and go through the steps required to make a simple tote bag.
Finished Sizes and Pattern Notes:
- The pattern is available in two sizes. Both sizes include a 12” (30.5 cm) strap.
- Rectangular: Approximately 6.5” (16.5 cm) x 3.5” (9 cm). This is the photographed sample and it requires hand sewing at the end to finish the project.
- Square: Approximately 6.5” (16.5 cm) square. If you’d prefer to work the entire project with your sewing machine, make this size.
Tools
- Sewing machine with straight stitch and a variety of built in stitches, such as the Baby Lock Brilliant. This machine also has a free arm, which is necessary for completing the Square size of the pattern on the sewing machine.
- Watch my Baby Lock Brilliant unboxing video below.
- If you can’t see my unboxing of the Baby Lock Brilliant above, click HERE to watch the video on YouTube.
- Omnigrid 45 mm rotary cutter, cutting mat, and acrylic ruler.
- If you’re new to working with a rotary cutter, the video below demonstrates how to use a rotary cutter safely.
- If you can’t see the video above demonstrating how to safely use a rotary cutter, click HERE to watch the video on YouTube.
- Oliso Mini Project Iron and Sewing by Sarah Wool Press ‘n Lock Tiles™ with Nifty Notions Mist Spray Bottle.
- Clover 7” Patchwork Scissors.
- Dritz Quilting Pins.
- Klassé Universal needle.
- 1 pair embroidery tweezers.
- Class 15 bobbin (or size needed for your machine).
- Basic sewing supplies (seam ripper, thread snips, etc.).
- For Rectangular size, you will also need a hand sewing needle for finishing and a thimble (optional).
Materials
- Benartex Color Weave by the Contempo Studio fabric – 1 fat quarter in each of 3 different colors. You can find Benartex fabrics at your local quilt shop or online at Fat Quarter Shop | Amazon | Annie’s
- 100% cotton thread for top spool and bobbin.
Instructions
Prepare for Sewing
- Press your fabrics to remove wrinkles.

- Using your rotary cutter, acrylic ruler, and cutting mat, cut 2 pieces each from Fabric A and Fabric B for the front and liner:
- Rectangular size: 7” (18 cm) x 4” (10 cm)
- Square size: 7” (18 cm) square.
- Cut pieces from Fabric C for the decorative Xs and the strap:
- Decorative Xs: Cut 4 strips measuring 2.5” (6.5 cm) x 10” (25.5 cm)
- Strap: Cut 1 strip measuring 2.5” (6.5 cm) x 12” (30.5 cm)

Decorate Front Pieces
- Fold both sides of each Decorative X strip towards the center along the length.

- Press flat.

- Pin the first Decorative X strip across 1 piece of Fabric A. Topstitch to sew the strip to Fabric A along both long edges of the Decorative X strip, removing the pins as you sew. Pin the next Decorative X strip across the same piece of Fabric A to form an X shape. Topstitch to sew the strip to Fabric A along both long edges of the Decorative X strip, removing the pins as you sew. Repeat the same process using Decorative X strips across 1 piece of Fabric B.

- For my version, I used a different stitch for each strip. I used the following stitches on the Baby Lock Brilliant: Straight stitches 2 and 3 and ZigZag stitches 8 and 12. I also purposely made each X completely different so I wouldn’t have to worry about lining up seams on the other front piece.
- Trim the excess fabric from the Decorative X strips.

Assemble Front and Liner
- Position decorated pieces of Fabric A and Fabric B with right sides together.

- Pin around 3 edges. For Rectangular size, you will be sewing along 2 long and 1 short edge; for Square size, you will be sewing along 3 adjacent sides.

- Using a quarter inch (0.25”) seam allowance, sew along 3 edges on the wrong side. Clip the corners at the side opposite the open edge.

- To form the liner, position undecorated/plain pieces of Fabric A and Fabric B with right sides together. Pin around 3 edges. Using a quarter inch (0.25”) seam allowance, sew along first 2 edges on the wrong side. On the third edge, leave an opening approximately 3” (7.5 cm) long. Finish seaming the third edge and leave the fourth edge unseamed. Clip the corners at the side opposite the open edge.
Prepare Strap
- Fold Fabric C strip for strap in half along long edge with right sides together.
- Using a quarter inch (0.25”) seam allowance, sew along raw edge.

- Use tweezers to turn strap right side out.
- Press strap flat. (It will be seriously wrinkled after turning it right side out!)
- Using a quarter inch (0.25”) seam allowance, top stitch along one side.
Assemble and Finish Wristlet Tote
- Turn front of Wristlet Tote (with decorated pieces) right side out. Press to remove wrinkles.
- Fold strap over so that short raw edges are together. Pin short raw edges to right side of front on one side of unseamed edge.

- Insert front of Wristlet Tote with strap into the liner. The liner will be wrong sides out with the right side facing the front piece and strap.

- The photo above shows the front piece “sticking out” of the liner. Before sewing, your front piece should be completely inside of the liner so that the top raw edges of the front piece, liner, and strap are all lined up. Pin together.
- For the Rectangular version, finish with hand sewing. For the Square version, finish using your sewing machine’s free arm. Using a quarter inch (0.25”) seam allowance, sew around the raw edge, seaming the liner, front, and strap together.
- Pull the front piece and strap out of the liner through the 3” (7.5) opening.
- Finish seaming the liner. Insert the liner into the front piece. Press to flatten and trim threads.
I hope you enjoyed this easy sewing pattern for beginners. Looking for more tote bag inspiration? Check out these other totes by the 2023 Benartex Brand Ambassadors!
- Charisma’s Corner Benartex Tote
- Flower Box Quilts Colorful Tote
- Just Let Me Quilt Steampunk Tote
- Nestlings by Robin BloomX Tote
- NM Designs X Marks the Spot Tote
- Olesya Lebedenko Design Zippered Tote
- Patterns by Jen Strip Pieced Tote
- Quilty Zest X Block Tote
- Sew Cute and Quirky Foundation Paper Pieced Tote