

The Cuddly Jamie crochet cat rag doll pattern is a perfect companion for the kiddos! Cuddly Jamie can easily be packed into your bag for an adventure, or laid next to you for nap time. This beginner-friendly pattern is an easy weekend project.

This post contains affiliate links. I may receive compensation (at no added cost to you) if you make a purchase using these links. I am a King Cole Brand Ambassador and this post is part of our ongoing collaboration. All opinions and words are my own. Additional supplies were generously provide by Fairfield World.
It’s no secret that I love cats. I have two rescues now and have lived with cats for most of my life. Cats are also pretty fun to crochet. If you feel the same way, you may want to check out my other free cat-inspired crochet patterns:
- The Black Cat Treat Bag is perfect for Halloween or as a child’s tote,
- Caterina the Cat is a quick and easy pocket pal that also works as an ornament or gift wrap embellishment,
- The Black Cat Softie is a beginner-friendly project that you can easily customize with different color yarn,
- Mr. Putty Cat, Sr. and Putty Cat, Jr. are a “matching” family pair in radically different sizes,
- The Patchwork Cat is a great scrap buster for using up all those leftover yarns from bigger projects,
- The Cuddly Cat Ears Beanie makes a cozy accessory in a child’s size, and
- The Cat Nap Coaster adds a feline and a handmade touch to your home decor.
If you also knit, check out the Cuddle Kitty, a knit softie pattern, and, if you want to make something to gift to your cat, try the Mitered Square Pet Blanket.
Ok, let me share a bit more about Cuddly Jamie. King Cole Fashion Aran is a yarn that I’ve really been enjoying during my time as a King Cole Brand Ambassador. Fashion Aran is available online at LoveCrafts or Wool Warehouse UK. Sometimes, the folks at the King Cole headquarters throw in a few extra skeins in my yarn orders, and this is how I came across these skeins in 3057 Ginger (on the left) and 630 Lewis (on the right). These particular skeins intrigued me because I’m not an “orange person” but both have neps (the little clumps of yarn in different colors). Suddenly, the Ginger really really called out to me! (Who knew neps could make such a difference?) I have always been intrigued by orange cats (or marmalade kitties as my special guy calls them), and with the blue as a complementary color, I knew I could combine these yarns together into a cat pattern.

One of the stresses I’m keenly aware of for new crochet toy makers (and even experienced ones) is getting everything to line up and look cute. I planned this pattern to be the fifth in my Weekend Mystery Crochet Alongs with Underground Crafter, and I know that folks aren’t necessarily toy experts when they jump into a mystery CAL. And that’s how the idea for a cat rag doll took shape. Rag doll style crochet toys are a bit more forgiving, they need less stuffing, and overall they are more beginner-friendly projects.

This post is part of the third annual Countdown to Christmas I’m sharing with folks signed up for the Crochet Along updates and the Underground Crafter newsletter.

Each day through December 24, 2025, I’m sharing a 2-day free coupon code straight to your inbox for one of my crochet patterns that is perfect for winter or holiday crafting. Cuddly Jamie is the December 18 featured pattern. Sign up now to get access to the free PDF! (When you sign up for this list, you get regular updates from Underground Crafter, and an update email about every pattern for the CALs I host as those patterns are released. When you sign up, you’ll also get access to my subscriber vault which includes exclusive free PDF patterns, a coupon code for your choice of any crochet or knitting pattern or ebook from my Ravelry shop, and coupon codes from other indie designers and crafts businesses.)
If you make your own Cuddly Jamie, I’d love to see it! Share your progress and questions by tagging me on Bluesky as @UndergroundCrafter, Facebook as @UndergroundCrafter, or on Instagram as @ucrafter. You can also share a picture in the Underground Crafters Facebook group. Sign up for my weekly newsletter and get a coupon code for your choice of one of my premium patterns and private access to my vault of subscriber goodies. Plus, you’ll never miss one of my free patterns again!
Add Cuddly Jamie to your favorites or queue, or buy the ad-free PDF on Ravelry.

Cuddly Jamie
Crochet Cat Rag Doll Pattern by Underground Crafter
Updated December 18, 2025


Cuddly Jamie is an adorable cat rag doll pattern. Cuddly Jamie is ready for going on every adventure or being a companion for nap time.This was the fifth pattern in the Weekend Mystery Crochet Alongs with Underground Crafter.
Finished Size
- Approximately 16” (40.5 cm) tall from tip of Ears to bottom of Back Paws after assembly and stuffing.
Materials
- King Cole Fashion Aran yarn (70% acrylic/30% wool, 3 oz/100 g, 219 yd/200 m) – 2 skeins in 3057 Ginger (CA) and 1 skein in 630 Lewis (CB), or approximately 225 yd (206 m) in CA and 40 yd (35.5 m) in CB in any medium weight acrylic or acrylic blend yarn.
- Fashion Aran is available online at LoveCrafts or Wool Warehouse UK.
- US Size G-10/6 mm crochet hook, or size needed to get gauge.
- Locking stitch markers.
- Yarn needle.
- I used the Ctcwsh ergonomic crochet hook set with stitch markers and yarn needles for my version.
- Fairfield Poly-Fil Premium Polyester Fiber Fill – 12 oz. bag.
- 12 mm slit safety eyes – 1 pair.
Gauge
- 19 sc = 4″ (10 cm). Exact gauge is not critical for this pattern. Stitches should be small so fiber filling doesn’t show.
Abbreviations Used in This Pattern
- CA – Color A
- CB – Color B
- ch – chain
- dc – double crochet
- invdec – invisible decrease – Insert hook in front loop only of each of next 2 sts, yo and draw up a loop, yo and draw through 2 loops. A helpful video tutorial for this decrease is available below.
- If you can’t see the invisible decrease video above, watch it on YouTube.
- pm – place stitch marker
- rep – repeat
- Rnd(s) – Round(s)
- sc – single crochet
- sl st – slip stitch
- st(s) – stitch(es)
- yo – yarn over
- [] Repeat instructions between brackets as indicated.
Pattern Notes
- Crochet over the yarn tails as you work. The video tutorial below demonstrates how to crochet over yarn tails.
- If you can’t see the video above demonstrating how to crochet over your yarn tails, watch it on YouTube.
- Oombawka Design has a helpful video tutorial for starting with the magic adjustable ring here.
- A helpful tutorial for seaming with the whipstitch is available below.
- If you can’t see the whipstitch video above, watch it on YouTube.
- A helpful video tutorial for the embroidery back stitch is available at the end of this blog post.
- This pattern was originally published in three parts as the fifth Weekend Mystery Crochet Alongs with Underground Crafter. This updated version presents the pattern pieces differently since the finished project is no longer a mystery.
Pattern Instructions
Nose
- With CB, ch 2.
- Row 1: Turn, skip 1 ch, 2 sc in next st. (2 sts)
- Row 2: Turn, ch 1, sc in first st, 2 sc in next st. (3 sts)
- Row 3: Turn, ch 1, sc in first 2 sts, 2 sc in next st. (4 sts)
- Fasten off CB with a long yarn tail (approximately 12”/30.5 cm) for seaming.
- With yarn needle, weave in short yarn tail from foundation chain.
Ears (Make 2)
- With CB, repeat as for Nose through Row 3. Do not fasten off.
- Row 4: Turn, ch 1, sc in first st and in each st across to last st, 2 sc in next st. (Increases by 1 st)
- Rows 5-7: Rep Row 4, 3 times. (8 sts after last Row)
- Fasten off CB with a long yarn tail (approximately 12”/30.5 cm) for seaming.
- With yarn needle, weave in short yarn tail from foundation chain.

Head
- With CA, start with magic adjustable ring (see Pattern Notes).
- Rnd 1: (Right Side) Ch 1, 6 sc in ring, pull yarn tightly to close ring, pm#1 in last st to mark position. Move marker up each Rnd. (6 sts)
- Rnd 2: 2 sc in each st around. (12 sts)
- Rnd 3: [2 sc in next st, sc in next st] around. (18 sts)
- Rnd 4: [2 sc in next st, sc in next 2 sts] around. (24 sts)
- Rnd 5: [2 sc in next st, sc in next 3 sts] around. (30 sts)
- Rnd 6: [2 sc in next st, sc in next 4 sts] around. (36 sts)
- Rnd 7: [2 sc in next st, sc in next 5 sts] around. (42 sts)
- Rnd 8: [2 sc in next st, sc in next 6 sts] around. (48 sts)
- Rnd 9: Sc in each st around.
- Rnds 10-13: Rep Rnd 9, 4 more times. Pm#2 on Rnd 13 to mark position for embellishment.
- Rnds 14–20: Rep Rnd 9, 7 more times.
- Position first safety eye at marked Round (Rnd 13) on Head. When satisfied with position, secure by attaching washer firmly inside of Head. Position second safety eye with approximately 4 stitches between first safety eye on same Round. When satisfied with position, secure by attaching washer firmly inside of Head. Remove marker#2.

- Remove crochet hook and insert marker in loop to prevent unravelling. Center Nose between safety eyes, approximately 1 Round below eyes as shown in the photo below. Thread yarn needle with CB from Nose and seam Nose to Head using whipstitch (see Pattern Notes). Embellish Lips/Mouth with embroidery back stitch (see Pattern Notes) using photo below as a guide. With yarn needle, weave in yarn tails on inside of Head. Remove stitch marker from loop and insert crochet hook to continue crocheting.

- Rnd 21: [Invdec, sc in next 6 sts] around. (42 sts)
- Rnd 22: [Invdec, sc in next 5 sts] around. (36 sts)
- Rnd 23: [Invdec, sc in next 4 sts] around. (30 sts)
- Rnd 24: [Invdec, sc in next 3 sts] around. (24 sts)
- Rnd 25: [Invdec, sc in next 2 sts] around. (18 sts)
- Rnd 26: [Invdec, sc in next st] around. (12 sts)
- Fasten off CA with long yarn tail (approximately 18”/46 cm) for seaming.
Front Paws (Make 2)
- With CB, start with magic adjustable ring (see Pattern Notes).
- Rnd 1: (Right Side) Ch 1, 6 sc in ring, pull yarn tightly to close ring, pm in last st to mark position. Move marker up each Rnd. (6 sts)
- Rnd 2: 2 sc in each st around. (12 sts)
- Rnd 3: [2 sc in next st, sc in next st] around. (18 sts)
- Rnd 4: Sc in each st around.
- Rnd 5: Rep Rnd 4 once.
- Rnd 6: [Invdec, sc in next st] around. (12 sts)
- Fasten off CB.
Back Paws (Make 2)
- With CB, repeat as for Front Paws through Round 3.
- Rnd 4: [2 sc in next st, sc in next 2 sts] around. (24 sts)
- Rnd 5: Sc in each st around.
- Rnds 6-7: Rep Rnd 5 twice.
- Rnd 8: [Invdec, sc in next 2 sts] around. (18 sts)
- Rnd 9: [Invdec, sc in next 4 sts] around. (15 sts)
- Fasten off CB.

Heart
- With CB, ch 2.
- Row 1: Turn, skip 1 ch, 2 sc in next st. (2 sts)
- Row 2: Turn, ch 1, sc in first st, 2 sc in next st. (3 sts)
- Row 3: Turn, ch 1, sc in first 2 sts, 2 sc in next st. (4 sts)
- Row 4: Turn, ch 1, sc in first 3 sts, 2 sc in next st. (5 sts)
- Rows 5: Turn, ch 1, skip first st, [4 dc in next st, sl st to next st] twice.
- Fasten off CB with a long yarn tail (approximately 12”/30.5 cm) for seaming.
- With yarn needle, weave in short yarn tail from foundation chain.
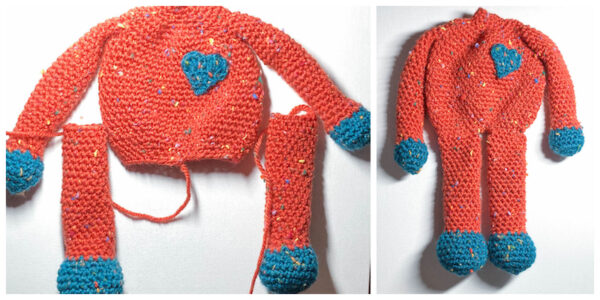
Body
- Starting at Neck, with CA, ch 13.
- Set Up Row: Turn, skip 1 ch, sc in next 12 ch, pm in last st to mark position and begin working in the Round. Move marker up each Rnd. (12 sts)
- Rnd 1: Sc in each st around.
- Rnd 2: Rep Rnd 1 once.
- Rnd 3: [2 sc in next st, sc in next st] around. (18 sts)
- Rnd 4: 2 sc in each st around. (36 sts)
- Rnd 5: [2 sc in next st, sc in next st] around. (54 sts)
- Rnds 6-8: Rep Rnd 1, 3 times.
Shape Armpit
- Rnd 9: [Ch 6, skip 6 sts, sc in next 21 sts] twice.
- Rnd 10: [Sc in next 6 ch, sc in next 21 sts] twice.
Continue Body
- Rnds 11-24: Rep Rnd 1, 14 times.
- Rnd 25: [Invdec, sc in next 7 sts] around. (48 sts)
- Rnd 26: [Invdec, sc in next 6 sts] around. (42 sts)
- Rnd 27: [Invdec, sc in next 5 sts] around. (36 sts)
- Rnd 28: [Invdec, sc in next 4 sts] around. (30 sts)
- Fasten off CA.
Attach Heart
- Thread yarn needle with CB from Heart and seam Heart to Body using whipstitch (see Pattern Notes). With yarn needle, weave in ends from Heart on inside of Body.

- Thread yarn needle with CA from foundation chain of Body. Seam Set Up Row closed and weave in yarn tail from beginning of Body.
Finish Legs
- Stuff all four Paws firmly with fiber filling.

- Start with any Paw and repeat process for all four Paws. Note: It may be easier to crochet without the Paws being stuffed. Remove the stuffing and set aside, work several rounds, then return stuffing to Paw.
- Rnd 1: Join CA to any st, ch 1, sc in same st and in each st around, pm in last st to mark position and begin working in the Round. Move marker up each Rnd.
- Rnd 2: Sc in each st around.
- For Front Paws: Rnds 3-24: Rep Rnd 2, 22 times. Fasten off CA with long yarn tail (approximately 18”/46 cm) for seaming.
- For Back Paws: Rnds 3-21: Rep Rnd 2, 19 times. Fasten off CA with long yarn tail (approximately 18”/46 cm) for seaming.
Attach Front Legs
- Starting with first Front Leg, thread yarn needle with CA from final round. Seam with whipstitch (see Pattern Notes) to Armpit armpit at upper Body. Weave yarn tails on inside of Body. Repeat with second Front Leg.

Attach Back Legs
- Starting with first Back Leg, thread yarn needle with CA from final round. Hold final round together and seam with whipstitch (see Pattern Notes). Seam Back Leg to lower Body opening on one side. Weave yarn tails on inside of Body. Repeat with second Back Leg, weaving in any remaining yarn tails.
Final Assembly
- Stuff Head firmly with fiber filling.

- Thread yarn needle with long yarn tail in CA from final round of Head. Join Head to Body at top Neck opening with whipstitch (see Pattern Notes).

- Position each of Ears 5 rounds above the Eyes using stitch markers to keep final row of each Ear in position. Starting with first Ear, thread yarn needle with CB from long yarn tail and joined to the Head with a whipstitch (see Pattern Notes). To get the curve for the cat Ears, seam the outer stitch of each Ear 1 round below the rest of the Ear (approximately 4 rounds above the Eyes). With yarn needle, weave in yarn tails on inside of Head.

- If needed, spray block Body. If you’re new to blocking, read Blocking Basics for Knitters and Crocheters.
Awe thank you! I just saw this and need to check my emails before the weekends!
Kitty is cute and I will make for Early start up of Christmas 2023~~