
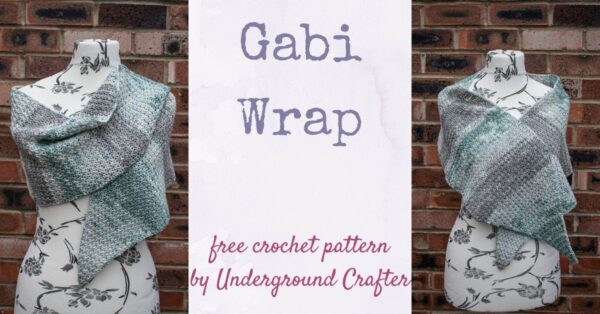
Gabi is an easy crochet wrap pattern made with just two skeins of yarn. It combines simple crochet stitch combinations — the lemon peel stitch and the crossed double crochet stitch — with easy increases and decreases to form an unusual shape with narrow tips so you can easily tie it if you don’t have a shawl pin.
This post contains affiliate links. I may receive compensation (at no added cost to you) if you make a purchase using these links. I am a King Cole Brand Ambassador and this post is part of our ongoing collaboration. All opinions and words are my own. Denise Interchangeables generously provided the crochet hook for this project.
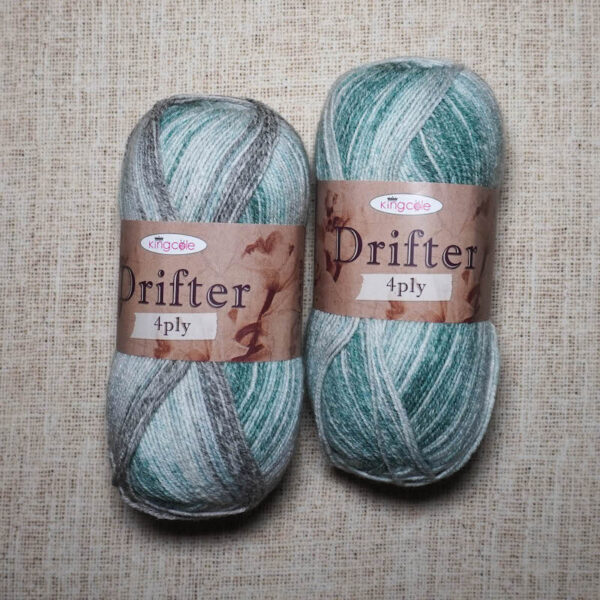
I love the Drifter family of yarns from King Cole, so I was excited when they released a 4Ply (super fine/#1 weight) version. Sadly, the yarn has since been discontinued. You can check out recommended substitutes at YarnSub.
One of the challenges I have always had with rectangular shawls is that they aren’t as easy to tie if you don’t have a shawl pin. For me, that means I wear them less when I’m out and about because I don’t want to lose one of my shawl pins (as I have done in the past). So for the Gabi Wrap, I tried a different shape — kind of a rectangle with a triangle on each end, if that makes sense. Overall, it adds up to fewer stitches for a wrap of the same length (which means it works up faster), but still has the a lot of the coziness of a rectangular shawl.

I hope you’ll enjoy the shape as much as I do!

If you make your own Gabi Wrap, I’d love to see it! Share your progress and questions by tagging me on Bluesky as @UndergroundCrafter, Facebook as @UndergroundCrafter, or on Instagram as @ucrafter. You can also share a picture in the Underground Crafters Facebook group. Sign up for my weekly newsletter and get a coupon code for your choice of one of my premium patterns and private access to my vault of subscriber goodies. Plus, you’ll never miss one of my free patterns again!
Add the Gabi Wrap to your favorites or queue, or buy the ad-free PDF on Ravelry.

Gabi Wrap
Easy Crochet Wrap Pattern by Underground Crafter


The Gabi Wrap was the sixth pattern in the Weekend Mystery Crochet Alongs with Underground Crafter. This easy crochet wrap pattern uses just two skeins of yarn. Its unusual shape has narrow tips so you can easily tie it if you don’t have a shawl pin.
Finished Size
- Teen/Adult: 62” (157.5 cm) long x 12” (30.5 cm) wide (at widest section) after blocking.
Materials
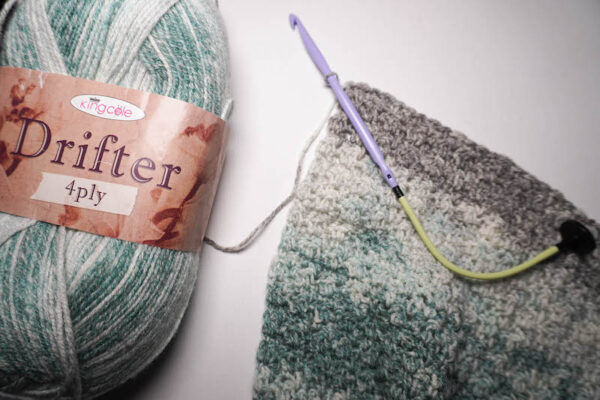
- King Cole Drifter 4Ply yarn (79% acrylic/17% cotton/4% wool, 3.5 oz/100 g, 437 yd/400 m) – 2 skeins in 4244 Water Lily, or approximately 810 yd (740.5 m) in any super fine weight, self-striping, cotton blend yarn.
- Drifter 4Ply has been discontinued. You can find recommended substitutes at YarnSub.
- Denise US Size I-9/5.5 mm crochet hook, or size needed to obtain gauge.
- Stitch markers.
- Yarn needle.
Gauge
- 20 sts in pattern for Part I = 4” (10 cm) across. Exact gauge is not critical for this pattern.
Abbreviations Used in This Pattern
- cdc – crossed double crochet – Skip next st, dc in next st, dc in skipped st. Each cdc counts as 2 sts. A video tutorial for this stitch is available below.
- If you can’t see the video tutorial above for the cdc, click HERE to watch it on YouTube.
- ch – chain
- dc – double crochet
- dc2tog – double crochet 2 stitches together (decrease) – [Yo, insert hook in next st, yo and draw up a loop, yo and draw through 2 loops] twice, yo and draw through all 3 loops on hook. A helpful video tutorial for this decrease is available below.
- If you can’t see the tutorial for the dc2tog above, watch it on YouTube.
- pm# – place marker#
- rep – repeat
- rm – remove marker
- sc – single crochet
- sc2tog – single crochet 2 stitches together (decrease) – [Insert hook in next st, yo and draw up a loop] twice, yo and draw through all 3 loops on hook. A helpful video tutorial for this decrease is available below.
- If you can’t see the video for the sc2tog above, watch it on YouTube.
- sl st – slip stitch
- st(s) – stitch(es)
- yo – yarn over
- () Work stitches between parentheses into same stitch.
- [] Repeat instructions between brackets as indicated.
Pattern Note
- If you’re new to blocking, you can find more details in Blocking Basics for Crocheters and Knitters.
Pattern Instructions
Wrap
Part I – Increase from tip to widest point
- Ch 2.
- Row 1: Turn, skip 1 ch, (sc, dc) in next ch, pm#1 in ch to mark starting point. (2 sts)
- Row 2: Turn, ch 1, sc in first st, (dc, sc) in next st. (3 sts)
- Row 3: Turn, ch 1, dc in first st, sc in next st, (dc, sc) in next st. (4 sts)
- Row 4: Turn, ch 1, dc in first st, [sc in next st, dc in next st] across to last st, (sc, dc) in next st. (Increases by 1 st to an odd number of sts)
- Row 5: Turn, ch 1, sc in first st, [dc in next st, sc in next st] across to last 2 sts, dc in next st, (sc, dc) in next st. (Increases by 1 st to an even number of sts)
- Row 6: Turn, ch 1, sc in first st, [dc in next st, sc in next st] across to last st, (dc, sc) in next st. (Increases by 1 st to an odd number of sts)
- Row 7: Turn, ch 1, dc in first st, [sc in next st, dc in next st] across to last 2 sts, sc in next st, (dc, sc) in next st. (Increases by 1 st to an even number of sts)
- Rep Rows 4-7 until piece measures approximately 10” (25.5 cm) from marker#1, ending after Row 7.
- Pm#set2 in first and last st of last row worked to mark position.
- Tip: It is helpful to count the number of sts in the last row worked to keep track of your total stitch count for the next sections.
Part II – Work even
- Row 8: Turn, ch 1, starting in first st [dc in next st, sc in next st] across. This stitch pattern is often called the Lemon Peel Stitch (see video below).
- If you can’t see the video tutorial for the Lemon Peel Stitch above, watch it on YouTube.
- Rep Row 8 until piece measures approximately 9” (23 cm) from marker#set2 (19”/48.5 cm from marker#1).
- Row 9: Turn, ch 1, sc in first st and in each st across. Pm#set3 in first and last st of row to mark position.
- Row 10: Turn, ch 1, dc in first st and in each st across.
- Rows 11-12: Rep Rows 9-10 once.
- Row 13: Rep Row 9 once. Pm#set4 in first and last st of row to mark position.
- Row 14: Turn, ch 3 (counts as dc), cdc across to last st, dc in next st.
- Rep Row 14 until piece measures approximately 19” (48.5 cm) from marker#set4.
- Row 15: Rep Row 9, but pm#set5 in first and last st of row to mark position.
- Rows 16-19: Rep Rows 10-12, but pm#set6 in first and last st of Row 19 to mark position.

- Rep Row 8 until piece measures approximately 9” (23 cm) from marker#set6.
Part III – Decrease from widest point to tip
- Row 20: Turn, ch 1, sc2tog in first 2 sts, [dc in next st, sc in next st] across. (Decreases by 1 st to an odd number of sts)
- Row 21: Turn, ch 1, sc2tog in first 2 sts, [dc in next st, sc in next st] across to last st, dc in next st. (Decreases by 1 st to an even number of sts)
- Row 22: Turn, ch 1, dc2tog in first 2 sts, [sc in next st, dc in next st] across. (Decreases by 1 st to an odd number of sts)
- Row 23: Turn, ch 1, dc2tog in first 2 sts, [sc in next st, dc in next st] across to last st, sc in next st. (Decreases by 1 st to an even number of sts)
- Rep Rows 20-23 until 3 sts remain, ending after a repeat of Row 20 or Row 22.
- Next Row (if last row was Row 20 ONLY): Turn, ch 1, sc2tog in first 2 sts, dc in next st. Do not finish off. Continue to edging.
- Next Row (if last row was Row 22 ONLY): Turn, ch 1, dc2tog in first 2 sts, sc in next st. Do not finish off. Continue to edging.

- Edging (worked in the round): (Right Side) Turn, ch 1, sc2tog in first 2 sts of final row, turn to work along raw edge, ch 1, sc in side of each row (see video below) to marker#6, remove marker#6 on current side only.
- If you can’t see the video above for crocheting around the side of rows, watch it on YouTube.
- [Sc in side of next row, 2 sc in side of next row] twice, sc in side of next row, remove marker#5 on current side only, 2 sc in side of each row across to marker#4, remove marker#4 on current side only, [sc in side of next row, 2 sc in side of next row] twice, sc in side of next row, remove marker#3 on current side only, sc in side of each row to marker#2, remove marker#2 on current side only, sc in side of each row to marker#1, ch 1, sc in marked st, remove marker#1, turn to work along next raw edge, sc in side of each row to marker#2, rm, sc in side of each row to marker#3, rm, [sc in side of next row, 2 sc in side of next row] twice, sc in side of next row, rm, 2 sc in side of each row across to marker#5, rm, [sc in side of next row, 2 sc in side of next row] twice, sc in side of next row, rm, sc in side of each row across to first st, ch 1, sl st to first sc to join. Fasten off.

Just finished. Enjoyed the pattern even though I didn’t complete it in time. Thank you