
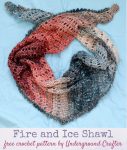
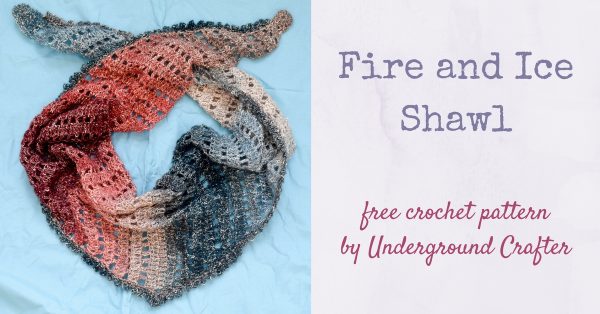
I’m so excited to share a crochet pattern for a simple, triangular shawl that is transformed into something spectacular with a self-striping, metallic yarn! I named it the Fire and Ice Shawl because of the yarn colors but also because it’s a bold, yet versatile accessory that you can wear as a scarf in cold weather, or as a decorative shawl all year round.
This post contains affiliate links. I may receive compensation (at no added cost to you) if you make a purchase using these links. Materials for the sample were generously provided by Lion Brand and Clover USA.
This pattern is part of ELK Studio’s Make It for Me crochet-a-long. I’m participating as a designer for the third consecutive year. If you love crochet shawl patterns, try the Rainbow After the Storm Shawlette (my 2016 MIFM pattern) and the Beach Stroll Memories Shawl (my 2017 MIFM pattern).

When I signed up for the 2018 Make It For Me, I knew I wanted to make another crochet shawl pattern. Confession time: For years, I struggled to wear my own crocheted goodies. I was crocheting all the time, but I never really wore anything I made. Everything was for gifts, to donate, to sell… (Sound familiar?) Finally, I discovered that triangular shawls really work for me.

I wear them under my coat as scarves and then throughout the day as decorative accessories. I designed the Fire and Ice Shawl using one skein of Lion Brand Shawl in a Ball Metallic yarn. I’ll admit that I wasn’t convinced until I actually made it that an entire shawl could emerge from this one ball of yarn, but it’s true. (I even had about 15% of the ball left, so if your gauge is a little different than mine, you should be able to get a shawl out of it, too.)

I love the way the color transformed as I crocheted, and also how the metallic looks in the finished shawl. I decided to try something new with this shawl, and I began and ended with a rounded tips. I love the result, and I hope you do, too.
If you make your own Fire and Ice Shawl, I’d love to see it! Share your progress and questions by tagging me on Bluesky as @UndergroundCrafter, Facebook as @UndergroundCrafter, or on Instagram as @ucrafter. You can also share a picture in the Underground Crafters Facebook group. Sign up for my weekly newsletter and get a coupon code for your choice of one of my premium patterns and private access to my vault of subscriber goodies. Plus, you’ll never miss one of my free patterns again!
Add the Fire and Ice Shawl to your Ravelry favorites or queue.


Fire and Ice Shawl
Crochet Shawl Pattern by Underground Crafter
Updated 7/4/2020


This simple, triangular shawl shines in a self-striping, metallic yarn.
Finished Size
- Adjustable. Photographed sample has 67” (170 cm) wingspan x 17” (43 cm) spine unblocked.
Materials
- Lion Brand Shawl in a Ball Metallic yarn (61% cotton/34% acrylic/5% other, 5.3 oz/150 g/481 yd/440 m) – 1 skein in 301 Moonstone, or approximately 481 yd (440 m) in any light medium weight yarn. NOTE: This yarn is discontinued but you can find a suitable substitute here on YarnSub.
- US Size J-10/6 mm crochet hook, or size needed to obtain gauge.
- Yarn needle.
- Locking stitch marker. (I used my Clover Quick Locking Stitch Marker Set.)
Gauge
- 17 dc x 7 rows = 4” (10 cm) in pattern. Exact gauge is not critical for this project.
Abbreviations Used in This Pattern
- ch – chain
- dc – double crochet
- dc2tog – double crochet 2 stitches together – Yo, [insert hook in next st, yo and draw up a loop, yo and draw through 2 loops] twice, yo and draw 3 loops. A helpful video tutorial for this stitch is available below.
- If you can’t see the video tutorial for the dc2tog above, watch it on YouTube.
- hdc – half double crochet
- pm – place stitch marker
- rep – repeat
- sc – single crochet
- sk – skip
- sl st – slip stitch
- sp – space
- st(s) – stitch(es)
- yo – yarn over
- *+ Repeat instructions after asterisk or plus sign as indicated.
- [] Repeat instructions between brackets as indicated.
- () Repeat instructions between parentheses in same stitch or space.
Pattern Note
- Shawl starts in the round with a circle for the first Rounded Tip. It is then worked in increasing rows to the midpoint, then in decreasing rows to the end point. The final Rounded Tip is crocheted in the round and then seamed to the rest of the shawl.
- Ch 1 at start of rows does NOT count as a stitch.
- A helpful tutorial for seaming with the mattress stitch is available below.
- If you can’t see the mattress stitch video above, watch it on YouTube.
Pattern Instructions
Shawl
Rounded Tip
- Ch 4, sk 3 ch, sl st to next ch to form ring.
- Set Up Round: Ch 1, 12 dc in ring, sl st to first dc to join. (12 sts)
- Row 1: Ch 1, dc in same st, hdc in next st, sc in next 2 sts, hdc in next st, dc in next st, sk next 6 sts. (6 sts)
Increase towards midpoint
- Row 2: Turn, ch 3 (counts as dc, here and throughout), dc in same st and in each st across. (7 sts)
- Row 3: Turn, ch 4 (counts as dc + ch-1 sp, here and throughout), sk first 2 sts, *dc in next st, ch 1, sk 1 st; rep from * across to last st, 2 dc in last st. (Increases by 1 st to an even number of sts)
- Row 4: Turn, ch 3, dc in same st and next st, *dc in ch-1 sp, dc in next st; rep from * across. (Increases by 1 st to an odd number of sts)
- Rep Rows 3-4 until shawl measures approximately 33” (84 cm) from beginning, ending after Row 4.
Shape center
- Row 5: Turn, ch 3, dc in next st and in each st across, pm around last st to mark center.
Decrease towards edge
- Row 6: Turn, ch 2 (does NOT count as a st), starting in first st dc2tog, dc in next st and in each st across. (Decreases by 1 st to an even number of sts)
- Row 7: Turn, ch 4, sk first 2 sts, dc in next st, *ch 1, sk 1 st, dc in next st; rep from * across to last 3 sts, ch 1, sk 2 sts, dc in last st. (Decreases by 1 st to an odd number of sts)
- Row 8: Turn, ch 1, sk first st, *dc in ch-1 sp, dc in next st; rep from * across. (Decreases by 1 st to an even number of sts)
- Rep Rows 7-8 until there are 6 sts left, ending after Row 8. Fasten off.
- Rep Rounded Tip instructions through Row 1. Fasten off with long yarn tail for seaming. With yarn needle, seam Rounded Tip to finished edge (after Row 8) using mattress stitch (see Pattern Notes).
Edging
- Edging Row 1: Working along angled edge, join yarn with sl st after Rounded Tip, ch 1, 2 sc in side of each row to marked center row, (2 sc, ch 2, 2 sc) in marked center row, pm in ch-2 sp, 2 sc in side of each row across to Rounded Tip.
- Edging Row 2: Turn, ch 1, (sc, ch 3, sc) in same st, *sk 1 st,** (sc, ch 3, sc) in next st;++ rep from * across, ending after ** before marked ch-2 sp, (2 dc, ch 1, 2 dc) in ch-2 sp, rep from * to ++ across. Fasten off.
Finishing
- With yarn needle, weave in ends.
Love it. I don’t make larger items because I tend not to ever get them finished. But this…. this may change my mind. I love the colors. And being done with a J hook, maybe will help me complete it. Thanks for a beautiful pattern.
This seems easy enough that I might could try it. I am fairly new to knitting and crochet but this seems doable. I can read the chart but it would sue be nice to see a video to confirm I am doing it right. Thank you for the pretty pattern.
Very pretty.
This seems like a nice simple shawl to start with. I’ve never made one and never really wear anything I make either. Plus this gives me a reason to buy a shawl in a ball that I’ve been eyeing but couldn’t justify buying yet lol. Thank you for the free pattern. Came here from Moogly hohd fyi
Beautiful, thank you so much for sharing x
I made this and love it. I wear it frequently over a lightweight sweater or with a coat. It was very easy and I’d highly recommend it!