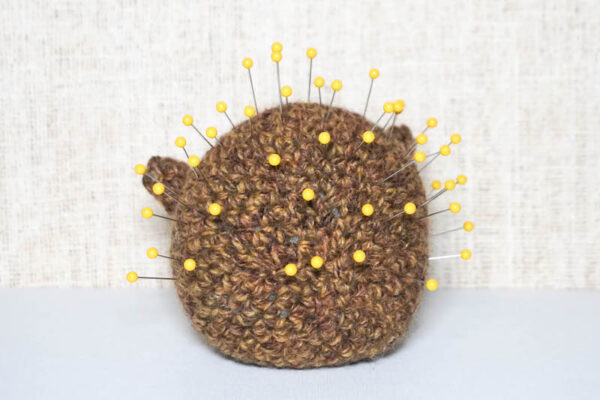
I’m sharing Pablo the Porcupine, an easy crochet pincushion pattern, today as part of the Stash Busting Blog Hop and Pattern Bundle! The pattern is forever free on my blog, but this deeply discounted pattern bundle is only available through January 29, 2023, so read on for details!

This post contains affiliate links. I may receive compensation (at no added cost to you) if you make a purchase using these links. I am a King Cole Brand Ambassador and this post is part of our ongoing collaboration. Additional supplies for this post were provided by Fairfield World.

If you love to crochet as much as I do, you’re bound to have plenty of yarn scraps. Those leftover bits from projects big and small, as well as random skeins that you bought to use “some day” and have since forgotten why. If busting through your yarn stash is on your list of New Year’s Resolutions, you’ll love the Stash Busting Blog Hop and Pattern Bundle. Inside the Stash Busting Pattern Bundle, you’ll find 28 fabulous crochet patterns by your favorite designers for scrappy and one-skein projects at a deeply discounted price.
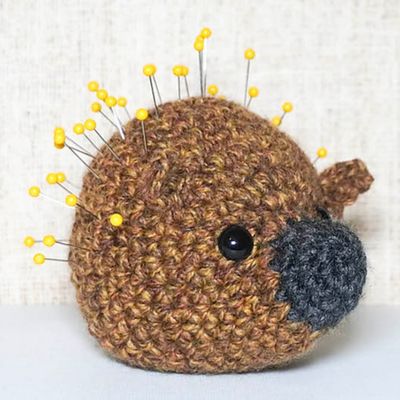
The Stash Busting Blog Hop and Pattern Bundle is organized by Made by Gootie and Raffamusa Designs. I used leftover yarn from two previous free crochet patterns (the Timber Beanie and the Friendly Baby Frankenstein’s Monster Doll) to make my contribution to the Stash Busting Blog Hop and Pattern Bundle: Pablo the Porcupine Pincushion. Pincushions are great stashbusters because they are small projects. This works up really quickly in bulky yarn! And, you can also use Pablo to keep track of your yarn needles, or pretty much any pointy thing you have lots of!

Scroll down for the free crochet pattern for Pablo the Porcupine Pincushion. The Stash Busting Blog Hop and Pattern Bundle is over, but you can visit the Stash Busting Blog Hop roundup page to find out about the daily featured patterns, all of which are available for free!


If you make your own Pablo the Porcupine Pincushion, I’d love to see it! Share your progress and questions by tagging me on Facebook as @Underground Crafter on on Instagram as @ucrafter. You can also share a picture in the Underground Crafters Facebook group. Sign up for my weekly newsletter and get a coupon code for your choice of one of my premium patterns and private access to my vault of subscriber goodies. Plus, you’ll never miss one of my free patterns again!
Add Pablo the Porcupine Pincushion to your favorites or queue, or buy the ad-free PDF on Ravelry.

Pablo the Porcupine Pincushion
Easy Crochet Pincushion Pattern by Underground Crafter


This easy crochet pincushion pattern is a great way to use up yarn scraps.
Finished Size
- Approximately 3.5” (9 cm) tall after stuffing.
Materials
- King Cole Big Value Chunky yarn (100% acrylic, 3.5 oz/100 g, 167 yd/152 m) – 1 skein in 3281 Charcoal (CB), or approximately 10 yd (9 m) in any bulky weight yarn.
- Big Value Chunky is available from your local yarn shop or online at LoveCrafts or Wool Warehouse UK.
- King Cole Big Value Poplar Chunky yarn (100% acrylic, 3.5 oz/100 g, 164 yd/150 m) – 1 skein in 4354 Chestnut (CA), or approximately 50 yd (46 m) in any bulky weight yarn.
- Big Value Poplar Chunky is available from your local yarn shop or online at LoveCrafts | Wool Warehouse UK.
- US Size H-8/5 mm crochet hook, or size needed to obtain gauge.
- Fairfield World Poly-Fil Premium Polyester Fiber Fill – 12 oz. bag.
- Clover bent-tip yarn needle.
- 12 mm black safety eyes – 1 pair.
- Stitch markers.
- Optional:
- Fairfield Poly-Fil Poly-Pellets Weighted Stuffing Beads – 24 oz. bag.
- Pair of stockings or tights.
Gauge
- Exact gauge is not critical for this pattern. Stitches should be small so fiber filling doesn’t show.
Abbreviations Used in This Pattern
- CA – Color A
- CB – Color B
- ch – chain
- invdec – invisible decrease – Insert hook in front loop only of each of next 2 sts, yo and draw up a loop, yo and draw through 2 loops. Planet June has helpful photo and video tutorials here.
- pm – place marker
- sc – single crochet
- sl st – slip stitch
- sp – space
- st(s) – stitch(es)
- yo – yarn over
- [] Repeat instructions between brackets as indicated.
Pattern Notes
- When choosing colors, note that CB is the color of the Nose and CA is the color of Ears and Body.
- Oombawka Design has a helpful video tutorial for starting with the magic adjustable ring here.
- A helpful photo tutorial for seaming with the whipstitch is available here.
Pattern Instructions
Ears (Make 2)
- With CA, ch 2.
- Row 1: Turn, skip 1 ch, 2 sc in next ch. (2 sts)
- Row 2: Turn, ch 1, sc in first st, 2 sc in next st. (3 sts)
- Row 3: Turn, ch 1, sc in first 2 sts, 2 sc in next st. (4 sts)
- Fasten off CA with long yarn tail, approximately 12”/30.5 cm, for seaming.
- With yarn needle, weave in shorter yarn tail from start of Ear.
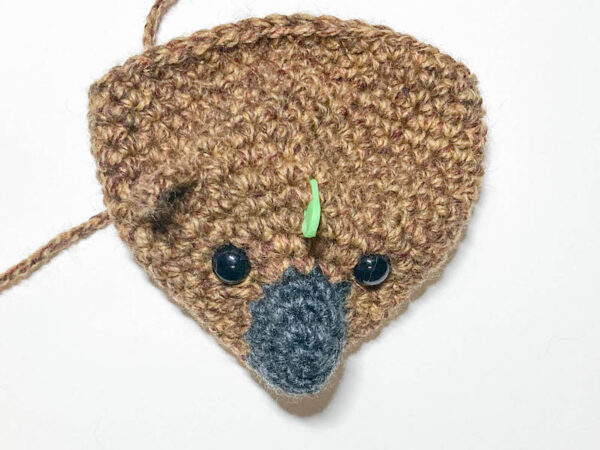
Nose
- With CB, start with magic adjustable ring (see Pattern Notes).
- Round 1: (Right Side) Ch 1, 6 sc in ring, pull yarn tightly to close ring, pm in last st to mark position. Move marker up each Round. (6 sts)
- Round 2: 2 sc in each st around. (12 sts)
- Round 3: Sc in each st around.
- Round 4: Repeat Round 3.
- Fasten off CB and remove stitch marker.
Body
- Round 1: Join CB with sl st to any st on Round 4 of Nose, ch 1, starting in same st [2 sc in next st, sc in next st] around, join with sl st to first sc. (18 sts)
- Note: Join is at the bottom of the Body. If you would like to reduce the appearance of the seam, finish Rounds 2-5 by working invdec into last sc and ch-1 at start of Round.
- Round 2: Ch 1, sc in first 6 sts, 2 sc in next 6 sts, sc in next 6 sts, join with sl st to first sc. (24 sts)
- Round 3: Ch 1, sc in first 6 sts, [2 sc in next st, sc in next st] 6 times, sc in next 6 sts, join with sl st to first sc. (30 sts)
- Round 4: Ch 1, sc in first st and in each st around, join with sl st to first sc. Pm above the nose to mark this Round for placement of safety eyes and Ears.
- Round 5: Ch 1, sc in first 6 sts, [2 sc in next st, sc in next 2 sts] 6 times, sc in next 6 sts, do not join, pm in last st to mark position. (36 sts)
- Round 6: Sc in each st around.
- Rounds 7-13: Repeat Round 6, 7 times, or until Body measures approximately 2” (5 cm) from Round 5 marker.
- Remove hook from loop and lock stitch marker around loop to prevent unraveling.

Embellish Face
- Position safety eyes in the Round below the marked Round.

- When satisfied with positions, secure by attaching washers firmly inside of Body. Position first Ear in the Round above the marked Round. Thread yarn needle with long yarn tail from end of Ear and join Ear to body with whipstitch (see Pattern Notes). Weave in yarn tails on inside of Body.
- Repeat with second Ear.

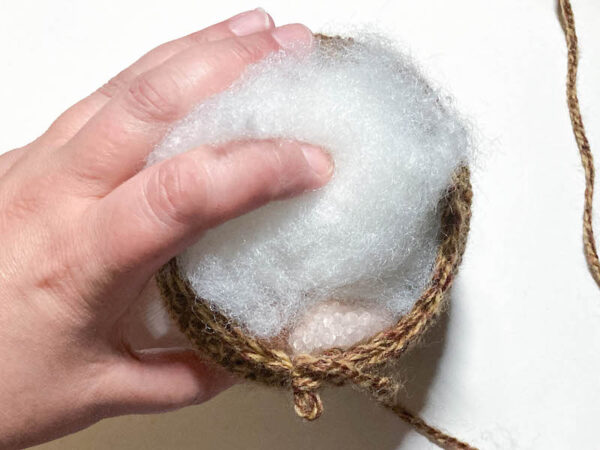
- Cut off a piece of stocking and tie with knot. Pour Poly-Pellets Weighted Stuffing Beads into stocking foot until it is approximately 1.5” (4 cm) in diameter. Tie top of stocking with knot.

- Starting with the Nose, stuff the Nose and Body thoroughly with fiber filling. Position the Poly-Pellets at the bottom of the Body as shown in the photo below.
- Remove stitch marker from loop and return crochet hook. Pm in last st of Round 13 to mark position. Move up marker each Round.
- Round 14: [Invdec, sc in next 4 sts] around. (30 sts)
- Round 15: [Invdec, sc in next 3 sts] around. (24 sts)
- Round 16: [Invdec, sc in next 2 sts] around. (18 sts)
- Round 17: [Invdec, sc in next st] around. (12 sts)
- Round 18: Invdec around. (6 sts)
- Round 19: Invdec around. (3 sts)
- Remove marker, fasten off CA. Fasten off with long yarn tail, approximately 12”/30.5 cm, for seaming.
- Thread yarn needle with long yarn tail from Body and whipstitch (see Pattern Notes) closed.
- Weave in yarn tail on inside of Body.