

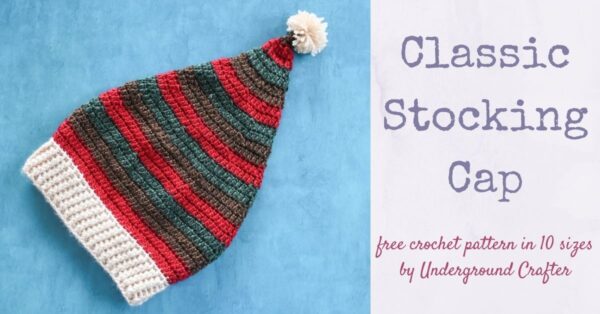
I’m sharing a crochet stocking hat pattern in 10 sizes so you can make one for everyone in the family! The Classic Stocking Cap is a beginner-friendly and gender-neutral design. The striping pattern provides a lot of opportunities for customization. You can do team colors, state colors, favorite colors, scrappy colors, and more!
This post contains affiliate links. I may receive compensation (at no added cost to you) if you make a purchase using these links. Yarn for this project was generously provided by Lion Brand.
One of the very first patterns I designed was the Stocking Caps for a 2010 issue of Crochet World. My original design was based on an even longer stocking cap I crocheted for myself and used to wear on particularly cold days. In the past few years, I’ve designed several crochet stocking hat patterns including the Slouchy Santa Stocking Cap, the Elf Hat with Ears, the Polar Bear Stocking Cap, and the Feliz Navidad Christmas Tree Hat.

For today’s pattern for the Classic Stocking Cap, I wanted to go back to basics and make a stocking cap with a simple design that celebrates the holiday season while still being wearable for the rest of the winter. I chose four colors in one of my favorite yarns, Lion Brand Heartland. I love the richness of the colors and also the heathered look. You can find Heartland online at Lion Brand | Amazon

If you’re new to post stitches, don’t worry! I’ve included video tutorials in the pattern to guide you through.

This post is part of the third annual Countdown to Christmas I’m sharing with folks signed up for the Crochet Along updates and the Underground Crafter newsletter.

Each day through December 24, 2025, I’m sharing a 2-day free coupon code straight to your inbox for one of my crochet patterns that is perfect for winter or holiday crafting. The Classic Stocking Cap is the December 12 featured pattern. Sign up now to get access to the free PDF! (When you sign up for this list, you get regular updates from Underground Crafter, and an update email about every pattern for the CALs I host as those patterns are released. When you sign up, you’ll also get access to my subscriber vault which includes exclusive free PDF patterns, a coupon code for your choice of any crochet or knitting pattern or ebook from my Ravelry shop, and coupon codes from other indie designers and crafts businesses.)
If you make your own Classic Stocking Cap, I’d love to see it! Share your progress and questions by tagging me on Bluesky as @UndergroundCrafter, Facebook as @UndergroundCrafter, or on Instagram as @ucrafter. You can also share a picture in the Underground Crafters Facebook group. Sign up for my weekly newsletter and get a coupon code for your choice of one of my premium patterns and private access to my vault of subscriber goodies. Plus, you’ll never miss one of my free patterns again!
Add the Classic Stocking Cap to your favorites or queue, or buy the ad-free PDF on Ravelry.

Classic Stocking Cap
Crochet Stocking Hat Pattern by Underground Crafter


This crochet stocking hat pattern is available in 10 sizes. The stripe pattern has lots of customization options, including team colors and seasonal variations!
Finished Sizes
- Newborn (0-3 Months, 3-6 Months, 6-12 Months, 1-2 Years, 3-5 Years, 6-12 Years, Teen/Adult Small, Adult Medium, Adult Large). Photographed sample is Child Small size.
- Newborn: 12” (30.5 cm) hat circumference x 14.5” (37 cm) length.
- 0-3 Months: 14” (35.5 cm) hat circumference x 15” (38 cm) length.
- 3-6 Months: 15” (38 cm) hat circumference x 15.25” (38.5 cm) length.
- 6-12 Months: 16” (40.5 cm) hat circumference x 15.75” (40 cm) length.
- Toddler: 17” (43 cm) hat circumference x 16” (40.5 cm) length.
- Child Small: 18” (45.5 cm) hat circumference x 16.25” (41.5 cm) length.
- Child Large: 19” (48.5 cm) hat circumference x 17” (49 cm) length.
- Teen/Adult Small: 20” (51 cm) hat circumference x 17.25” (43 cm) length.
- Adult Medium: 21” (53.5 cm) hat circumference x 17.75” (45 cm) length.
- Adult Large: 22” (56 cm) hat circumference x 18” (46 cm) length.
Materials
- Lion Brand Heartland yarn (100% acrylic, 5 oz/142 g, 251 yd/230 m) – 1 skein each in 098U Acadia (CA), 113R Redwood (CB), 180G Kings Canyon (CC), and 126U Sequoia (CD), or approximately 85 yd (95 yd, 100 yd, 105 yd, 115 yd, 120 yd, 125 yd, 130 yd, 135 yd, 145 yd)/78 m (87 m, 91.5 m, 96 m, 105 m, 110 m, 114.5 m, 119 m, 123.5 m, 132.5 m) in CA and 45 yd (55 yd, 60 yd, 65 yd, 70 yd, 75 yd, 85 yd, 90 yd, 95 yd, 105 yd)/41 m (50.5 m, 55 m, 59.5 m, 64 m, 68.5 m, 78 m, 82.5 m, 87 m, 96 m) each in CB, CC, and CD in any medium weight yarn.
- Lion Brand Heartland is available online at Lion Brand | Herrschners | Amazon
- US Size H-8/5 mm crochet hook, or any size needed to obtain correct gauge.
- Yarn needle.
- (Optional) Clover Pom Pom Maker (available online at Lion Brand | Herrschners | WeCrochet | Amazon)– I used the 2-1/2” size for the Child Small version.
Gauge
- 18 sts = 4” (10 cm) across in pattern for Rnd 2. See Pattern Notes for gauge swatch instructions. For best fit, always check your gauge.
Abbreviations Used in This Pattern
- BL – back loop – Rich Textures Crochet has a helpful video demonstrating how to identify the back loop in crochet here.
- BPdc – back post double crochet – Yo, insert hook from back around front to back of st in previous row, yo and draw up a loop, [yo and draw through 2 loops] twice. A helpful video tutorial for this stitch is available below.
- If you can’t see the BPdc video above, watch it on YouTube.
- CA – Color A
- CB – Color B
- CC – Color C
- CD – Color D
- ch – chain
- dc – double crochet
- dc2tog – double crochet 2 stitches together (decrease) – [Yo, insert hook in next st, yo and draw up a loop, yo and draw through 2 loops] twice, yo and draw through all 3 loops on hook.A helpful video tutorial for this stitch is available below.
- If you can’t see the dc2tog video above, watch it on YouTube.
- FPdc – front post double crochet – Yo, insert hook from front around back to front of st in previous round, yo and draw up a loop, [yo and draw through 2 loops] twice. A helpful video tutorial for this stitch is available below.
- If you can’t see the FPdc video above, watch it on YouTube.
- rep – repeat
- Rnd(s) – Round(s)
- sl st – slip stitch
- st(s) – stitch(es)
- yo – yarn over
- *Repeat instructions after asterisk as indicated.
- [] Repeat instructions between brackets as indicated.
Pattern Notes
- Ch 1 at start and sl st at end of Rounds do not count as stitches.
- To work your gauge swatch:
- Ch 21. Row 1: Turn, skip 1 ch, dc in next 20 ch. (20 sts) Row 2: Turn, ch 1, dc in first st, [FPdc around next st, BPdc around next st] across to last st, dc in next st. Rep Row 2 until swatch measures approximately 4” (10 cm) tall.
- A helpful video tutorial demonstrating a whipstitch seam is available below.
- If you can’t see the video above demonstrating a whipstitch seam, watch it on YouTube.
- A helpful video tutorial demonstrating how to crochet around the side of your project is available below.
- If you can’t see the video above demonstrating how to crochet around the side of your project, watch it on YouTube.
- Helpful tips for making pompoms without a pompom maker are available here.
Pattern Instructions
Hat
- Starting at brim, with CA, ch 55 (65, 69, 73, 77, 83, 87, 91, 95, 99).
- Rnd 1: Turn, skip 1 ch, dc in next ch and each ch across, join with sl st to first dc. – 54 (64, 68, 72, 76, 82, 86, 90, 94, 98) sts
- Rnd 2: Turn, ch 1, starting in first st [FPdc around next st, BPdc around next st] around, join with sl st to first FPdc.
- Rep Rnd 2 until Hat measures 2” (5 cm), fasten off CA, join CB with sl st to first FPdc.
- Continue rest of Hat with the following striping pattern: two Rounds in CB, two Rounds in CC, two Rounds in CD, changing to next color by joining with sl st at the end of round and carrying the unused colors on the inside of the Hat.
- Rnd 3: Ch 1, dcBL in same st and in each st around, join with sl st to first dc.
- Rnd 4: Ch 1, dc in same st and in each st around, join with sl st to first dc.
- Rep Rnd 4 until hat measures 2.75” (3.25”, 3.5”, 4”, 4.25”, 4.75”, 5.25”, 5.5”, 6”, 6.25”)/7 cm (8.5 cm, 9 cm, 10 cm, 11 cm, 12 cm, 13.5 cm, 14 cm, 15 cm, 16 cm) in length, do not fasten off.
- Continue on to Next Rnd instructions for specific size.
Newborn (Toddler, Adult Large) Sizes
- Continue with 54 sts (76, 98) sts.
- Next Rnd: Ch 1, 2 dc in first st, dc in each st around, join with sl st to first dc. – 55 (77, 99) sts
- Continue on to Decrease to Stocking Cap Tip – All Sizes.
0-3 Months (Child Large) Sizes
- Continue with 64 (86) sts.
- Next Rnd: Ch 1, starting in first st [2 dc in next st, dc in next 31 (42) sts] twice, join with sl st to first dc. – 66 (88) sts
- Continue on to Decrease to Stocking Cap Tip – All Sizes.
3-6 Months (Teen/Adult Small) Sizes
- Continue with 68 (90) sts.
- Next Rnd: Ch 1, starting in first st [dc2tog in next st, dc in next 32 (43) sts] twice, join with sl st to first dc. – 66 (88) sts
- Continue on to Decrease to Stocking Cap Tip – All Sizes.
6-12 Months Size
- Continue with 72 sts.
- Next Rnd: Ch 1, starting in first st [dc2tog in next st, dc in next 10 sts] around, join with sl st to first dc. – 66 sts
- Continue on to Decrease to Stocking Cap Tip – All Sizes.
Child Small Size
- Continue with 82 sts.
- Next Rnd: Ch 1, dc in first 22 sts, [dc2tog in next st, dc in next 10 sts] around, join with sl st to first dc. – 77 sts
- Continue on to Decrease to Stocking Cap Tip – All Sizes.
Adult Medium Size
- Continue with 94 sts.
- Next Rnd: Ch 1, dc in first 4 sts, [dc2tog in next st, dc in next 13 sts] around, join with sl st to first dc. – 88 sts
- Continue on to Decrease to Stocking Cap Tip – All Sizes.
Decrease to Stocking Cap Tip – All Sizes
- Continue with 55 (66, 66, 66, 77, 77, 88, 88, 88, 99) sts.
- Next Rnd: Ch 1, dc in first st and each st around, join with sl st to first dc.
- Decrease Rnd 1: Ch 1, starting in first st [dc2tog, dc in next 9 sts] around, join with sl st to first dc2tog. – 50 (60, 60, 60, 70, 70, 80, 80, 80, 90) sts
- Decrease Rnd 2: Ch 1, dc in first st and each st around, join with sl st to first dc.
- Decrease Rnd 3: Ch 1, starting in first st [dc2tog, dc in next 8 sts] around, join with sl st to first dc2tog. – 45 (54, 54, 54, 63, 63, 72, 72, 72, 81) sts
- Decrease Rnd 4: Rep Decrease Rnd 2 once.
- Decrease Rnd 5: Ch 1, starting in first st [dc2tog, dc in next 7 sts] around, join with sl st to first dc2tog. – 40 (48, 48, 48, 56, 56, 64, 64, 64, 72) sts
- Decrease Rnd 6: Rep Decrease Rnd 2 once.
- Decrease Rnd 7: Ch 1, starting in first st [dc2tog, dc in next 6 sts] around, join with sl st to first dc2tog. – 35 (42, 42, 42, 49, 49, 56, 56, 56, 63) sts
- Decrease Rnd 8: Rep Decrease Rnd 2 once.
- Decrease Rnd 9: Ch 1, starting in first st [dc2tog, dc in next 5 sts] around, join with sl st to first dc2tog. – 30 (36, 36, 36, 42, 42, 48, 48, 48, 54) sts
- Decrease Rnd 10: Rep Decrease Rnd 2 once.
- Decrease Rnd 11: Ch 1, starting in first st [dc2tog, dc in next 4 sts] around, join with sl st to first dc2tog. – 25 (30, 30, 30, 35, 35, 40, 40, 40, 45) sts
- Decrease Rnd 12: Rep Decrease Rnd 2 once.
- Decrease Rnd 13: Ch 1, starting in first st [dc2tog, dc in next 3 sts] around, join with sl st to first dc2tog. – 20 (24, 24, 24, 28, 28, 32, 32, 32, 36) sts
- Decrease Rnd 14: Rep Decrease Rnd 2 once.
- Decrease Rnd 15: Ch 1, starting in first st [dc2tog, dc in next 2 sts] around, join with sl st to first dc2tog. – 15 (18, 18, 18, 21, 21, 24, 24, 24, 27) sts
- Decrease Rnd 16: Rep Decrease Rnd 2 once.
- Decrease Rnd 17: Ch 1, starting in first st [dc2tog, dc in next st] around, join with sl st to first dc2tog. – 10 (12, 12, 12, 14, 14, 16, 16, 16, 18) sts
- Decrease Rnd 18: Rep Decrease Rnd 2 once.
- Decrease Rnd 19: Ch 1, starting in first st [dc2tog] around, join with sl st to first dc2tog. – 5 (6, 6, 6, 7, 7, 8, 8, 8, 9) sts
- Decrease Rnd 20: Rep Decrease Rnd 2 once.
- Continue on to Decrease Rnd 21 instructions for specific size.
Newborn (Toddler, Child Small, Adult Large) Sizes
- Continue with 5 (7, 7, 9) sts
- Decrease Rnd 21: Ch 1, dc in first st, [dc2tog] around, join with sl st to first dc2tog. – 3 (4, 4, 5) sts
- Continue on to Assembly and Finishing – All Sizes.
0-3 Months (3-6 Months, 6-12 Months, Child Large, Teen/Adult Small, Adult Medium) Sizes
- Continue with 6 (6, 6, 8, 8, 8) sts
- Decrease Rnd 21: Ch 1, starting in first st, [dc2tog] around, join with sl st to first dc2tog. – 3 (3, 3, 4, 4, 4) sts
- Continue on to Assembly and Finishing – All Sizes.
Assembly and Finishing – All Sizes
- Fasten off current yarn color with long tail (approximately 12”/30.5 cm) for seaming. Fasten off other yarn colors from striping sequence.
- Thread yarn needle with yarn tail from stocking cap tip, whipstitch (see Pattern Notes) tip closed.
- With CA, make pompom following instructions on Clover Pom Pom Maker. Alternatively, see Pattern Notes for link to tutorial for making a pompom by hand.
- Trim pompom.
- Attach pompom to hat using yarn needle and yarn tail that tied pompom together.
- With CA from foundation chain, whipstitch initial round at brim closed.
- With yarn needle, weave in all ends on inside of hat.