
If you joined the You’ve Got Options Crochet Along with 12 granny square patterns by 12 designers, or if you’re just a granny square lover like me, you’ve probably spent lots of time thinking about how to piece together a blanket using squares by different designers. In this Tips Tuesday post, I’ll share my five favorite tips for how to design a beautiful blanket using granny square patterns from multiple sources.
This post contains affiliate links. I may receive compensation (at no added cost to you) if you make a purchase using these links.
One option is to make a folky, scrappy blanket. These “stash buster” blankets are often pieced together at random, or squares are joined to the larger project as they are finished.
But what if you want to use many different squares to create a blanket that looks more cohesive and planned? I’m sharing 5 tips for designing a blanket that has the look that you want while combining granny square patterns from different sources.
1) Start by selecting colors
For a scrappy look, follow the quilters’ adage and use 7 or more colors. Surprisingly, with this many colors, you don’t have to worry much about whether they all “match” as long as colors placed side by side look harmonious.

For a planned blanket, choose a more limited color palette of 3-4 colors for the squares and 1 additional color for borders and joins. If you feel anxious about choosing colors, stick with one brand and one line of yarn since these colors usually work well together. Or, read this great post on color theory for crocheters on Shiny Happy World.

2) Pick patterns that connect easily
Your blanket will have a more uniform look if each row is the same size. The simplest way to do this is to select square patterns of the same size. 4”, 6”, 8”, 12”, and 20” square patterns are common options.
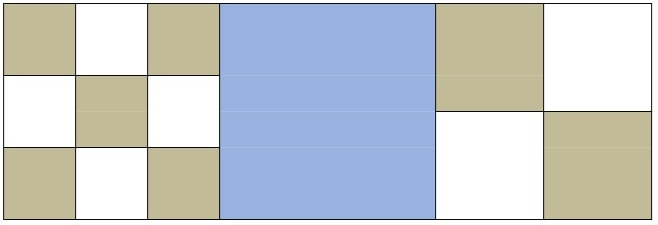
Another option is to choose sizes that can easily be combined. For example, the diagram below shows how you can connect nine 4″ squares (at right) to one 12″ square (at center) and four 6″ squares (at left).
Of course, when you are working with granny square patterns from multiple designers, you may find that projects that are supposed to result in squares of the same sizes don’t always end up the same size due to differences in your tension, yarn choice, hook, and so on. You might choose to “square up” the smaller squares by working a border of stitches around the square (including 3 stitches in each of the four corners to keep the corners from puckering).
3) Lay out the final blanket before joining
A blanket will look most cohesive if you lay it out and choose your favorite arrangement before joining squares together. You can lay out motifs on a large flat surface (like your bed), or you take a picture of each square and sample your virtual layout using BeFunky or PicMonkey collages. Moogly has a great tutorial on using PicMonkey to plan a blanket here.
4) Choose a join to create the right look
There are three major ways to join granny squares.
An invisible join on the wrong (back) side of the blanket is best if you don’t want the seams to be part of the blanket’s design. I have several tutorials for invisible seams available:
- The mattress stitch,
- The whipstitch, and
- The slip stitch.
On the other hand, a more visible join, like using single crochet join on the right (front) side to create a dimensional sashing, or using a lacy join to create a more delicate look, might be the right fit for your project. You can find my tutorial for a single crochet join here.
A third option is to “join-as-you-go.” Unless you plan your layout before starting your squares (or if you are going for a scrappy look), this technique is more difficult to use when working with squares from multiple designers. You can find my tutorial for the join-as-you-go method here.
5) Unify the blanket with a border
Finally, pull all of the squares and colors of the project together with a border. Choose a solid color for a classic look, find a variegated yarn that includes colors like those in the blanket, or use multiple colors. You can find 27 free crochet border patterns here, and my favorite book of crochet border patterns is Around the Corner Crochet Borders by Edie Eckman.
I hope you found these tips for how to design a beautiful blanket using granny square patterns from multiple sources helpful. You may be wondering about the granny square patterns in the collage above. You can find the links to each pattern below.
Left column, from top to bottom
- Forget Me Not Square
- Circle and Popcorn Granny Square
- Eva Square from the Textures and Tassels Blanket Crochet Along
Center column, from top to bottom
- Bobble Berry Washcloth
- Bobbles and Spokes Square from the Textures and Tassels Blanket Crochet Along
- Clusters in the Corner Square
Right column, from top to bottom
- Motif A from the Patchwork Carry-All
- A Ray of Sunshine Square
- Berrylicious Square
What are your favorite ways to use granny squares from multiple sources in one project?
Awesome tip! Thank you so much for sharing!
Glad you like it, Joanita! Thanks for stopping by.
Wow this was so helpful thank you. Can’t wait to try it.
Glad it could help, Carol!
Great tips, never too old (70) to learn!
That’s a great attitude to have, Cheryl! It’s wonderful to keep learning all the time.
Thanks; I’m organizing a lapghan/prayer shawl ministry. This has helped already!
So glad it could help, Chris! Thank you for the work you do.